Saturday, October 31, 2015

26 Awesome Brush Tutorials for Adobe Illustrator on Tuts+


The brushes in Adobe Illustrator are incredible tools that allow you to create and do a multitude of things. This week we've focused purely on beginner content for those who wish to get a better understanding on brushes. These aren't the only tutorials we have on Tuts+, in fact I'd like to share with you many of our others.
View More At : http://design.tutsplus.com/articles/26-awesome-brush-tutorials-for-adobe-illustrator-on-tuts--vector-25248

Thursday, October 29, 2015

Fall Weekend Inspiration CLXIII

Happy Weekend Everyone and Welcome to our 163rd Fall Themed Edition of Weekend Inspiration!


Every week we gather 25 (or 26..) photos from all around the Web to give a kick-start to YOUR weekend!
So where do all these photos come from exactly?! Well, they are gathered from popular photo sharing Websites such as Flickr, 500PX, Behance and also from photographer’s personal Websites. These photos come from both amateur and professional photographers alike, and there’s always an image or two in here from the Phamily.
So what are you waiting for?! Have a look at these 25 Fall themed inspiring photos, and feel free to tell us your favourites!
Get inspired!!:)
*View end of post for information on how to get YOUR content featured in an edition of weekend inspiration
Note: Some content in this post may be considered graphic/NSFW

Weekend Inspiration CLXIV

Happy Weekend Everyone and Welcome to our 164th Edition of Weekend Inspiration!


Every week we gather 25 (or 26..) photos from all around the Web to give a kick-start to YOUR weekend!
So where do all these photos come from exactly?! Well, they are gathered from popular photo sharing Websites such as Flickr, 500PX, Behance and also from photographer’s personal Websites. These photos come from both amateur and professional photographers alike, and there’s always an image or two in here from the Phamily.
So what are you waiting for?! Have a look at these 25 inspiring photos, and feel free to tell us your favourites!
Get inspired!!:)
*View end of post for information on how to get YOUR content featured in an edition of weekend inspiration

Monday, October 26, 2015

Add detail-enhancing effects to your images


Video tutorial: Enhance detail using correction

Want to add HDR-style detail-enhancing effects to your images? Ben Secret shows you how.

  • Software: Photoshop CS3 or later
  • Project time: 5 minutes
  • Skills: Balance colours with curves and selective colours, apply local and spot colour corrections, use layer management to keep things tidy
In this tutorial I’ll go through three very common ways to make local colour and tone adjustments. Some of these adjustments are simply correcting things I’ve inadvertently made wrong. For example, this image of Louise Thompson, by photographerRuth Rose, has been styled with a colour process that adds cold greens and blues to the shadows. This works with the backdrop and adds an interesting film-like colouring to the skin tones, but unfortunately the hair wasn’t so lucky, and has been turned a bit blue.

I’d also brought up the mid-tones, as it was quite a dark image, but this has had a bleaching effect on the jeans. So sometimes I’ll style things one way, then use local adjustments to fix all the problems I’ve created in doing so.

Step 01

With a critical eye, one of the first things we should notice about this image is that the torso region seems a little cold and off-colour. So we’re going to select the Lasso tool, set the Feather to 15px, then roughly draw around the stomach region. Now add a Curves adjustment layer, and you should find it’s automatically masked the torso for you.

Step 02

Now we need to figure out what we have to do to our curves to push the colour more towards the natural skin colour of the rest of the image. There’s a slight greyness to the mid-tones, so selecting the Red channel in Curves, just bring the mid-point up a small way to add some warmth. Do the same with the Blue channel, but bring it up slightly less.

Step 03

These faded-looking jeans should be a little easier. As they’re red, we can use a Selective Color layer to localise the effect. The only problem is it will interfere with the skin too. So as before, use the Lasso to isolate the jeans, add a Selective Color adjustment layer, and with the Red channel selected, just bring the Black slider up a bit.

Step 04

There are still some regions that could do with warming up – particularly that blue-ish hair. For this, we’re going to first create a nice, natural warmth effect for the whole image. Add a Curves adjustment layer and, as with step 02, bring the Red curve’s mid-point up a bit, and bring the Blue curve’s mid-point down slightly.

Step 05

Now, ensuring we’ve got the Curves layer’s mask highlighted in the Layers panel, we should be able to flip this into a hide-all mask with Cmd/Ctrl+I. Next, select a medium-sized, soft white paint brush – I use a flow of about 20% – and we can simply start painting over anything we want to warm up, mainly the hair and shadows.

PHOTOSHOP CS6 PRESETS: PHOTOGRAPHIC TONING RETOUCH METHOD

Graphic Designers are used Photoshop CS6 to find its full potential. The Photoshop CS^ is well known for its 3D features and other new tools like more blur tool option, Color lookup effects and Oil painting effect from filter section are very useful when comes upload your photos in different social media networks.

Users are very much engaged in Instagram after Facebook brought it. Tumblr and Pinterest are next to them, even thought these two sites are good for photo sharing – Instagram is unique to share image with different styles like retro, vignette effects from its default App settings.

Now you can share your images with more different styles apart from their default color schemes. Before going through this quick-tip tutorials for readers you should check our detail image preview of “Color Lookup” effects we created earlier in our blog.

You Might like our “Photoshop CS6 tutorials” we wrote in our Blog

Quick-Tip: Photographic Tones good for Photo Re-Touch


This effect we achieved from experimenting with other adjustment tool found in Photoshop CS6. Now you can compare the next image, which is a stock image(original).

Step:1 Open a Image you like to use. We used premium stock images, however you can use any images you own.
Photoshop CS6 Presets ready
Image Source via Shutterstock[Glamour girl lies in a swimsuit]

Step:2
Choose Gradient Map tool and change to default settings. Now right-click and select option and change to “Photographic Toning” and change the view from thumbnail to small list.


Now you will find many different gradient map with the names, as shown below in the preview image.


That’s it, now you can go through all the effects one by one. Always make a copy of original image and duplicate for comparing them. The following effects are achieved by default gradient map.


Hope you liked it and these are default effects shown above if you experiment with other filter effects – you can get many new photo effects.

Thank you very much 

How to Create a Porcelain Skin Effect in Adobe Photoshop CS6 (Exclusive Tutorial)

porcelain skin Photshop CS6 tutorial
Creating this stunning porcelain skin effect is easier than you may expect. I'll show you step by step how to achieve the effect in Photoshop CS6 but this tutorial works in any version of CS.
But before we start, check these useful resources for photo manipulation that will help you create an amazing effect on your photo:
This tutorial uses a non-destructive method of photo editing. All editing is done on adjustment layers leaving your original photo intact.

1. To begin open the photo you want to work with in Photoshop. We are going to add an adjustment layer. On the bottom of your layers pallet click the Adjustment Layer icon. From the options flyout choose Solid Color.
1a. porcelain skin Photshop CS6 tutorial
1b. porcelain skin Photshop CS6 tutorial

Set your solid color layer to pure white. Once the color picker dialog box opens slide the color picker over to white or set the color value in the dialog box.
1c.  porcelain skin Photshop CS6 tutorial
Once you click OK you will see that your adjustment mask has been added.
1.d  porcelain skin Photshop CS6 tutorial
2.Now we are going to set our layer properties. On your layers palette set your Color Fill layer's Blend Mode to Soft Light. You should have something like this.
porcelain skin Photshop CS6 tutorial
2b.  Next double click on your Color Fill layer to open the Layer Style Dialog Box. Head down to the Blend If dialog area.
Note the current settings:
porcelain skin Photshop CS6 tutorial
Holding down the ALT key click on the Right side of the marker for the Underlying layer marker. Now begin to drag the split marker all the way over to right. Value should read 0/255. Click OK
porcelain skin Photshop CS6 tutorial
Notice the icon for the Color Fill layer has changed. This indicates advanced blending properties.
porcelain skin Photshop CS6 tutorial
You should now have something that looks like this.
porcelain skin Photshop CS6 tutorial
With your Color Fill layer activated Ctrl + J to Duplicate your Color Fill Layer. Do this 3 to 5 times depending on the photo you chose and the amount of effect you want to apply. For this photo I will duplicate my layer 3 times. Once you've completed duplicating your layers select ALL Color Fill Layers. With your Color Fill Layers selected use keyboard command Ctrl + G to group all layers.
porcelain skin Photshop CS6 tutorial  porcelain skin Photshop CS6 tutorial
With your Group selected go down to the bottom of the layers palette and click the third icon from the left to add a layer mask. With the thumbnail icon selected Ctrl + I to invert your mask. This will make your image appear to have returned to it's original state.
porcelain skin Photshop CS6 tutorial
3.  Now for the fun part! It's time to add our porcelain skin. Grab your brush tool. Select a size that works well with the image you are working on. You want your brush as large as possible to paint the larger portions of skin and scale your brush down to size to continue painting the more intricate areas. Your foreground color should be white and the brush hardness should be set to 0.
You should begin with something like this
porcelain skin Photshop CS6 tutorial
Continue paint until all skin areas are covered.
porcelain skin Photshop CS6 tutorial
Make a few tweaks if you desire. Adjust layer opacity, add a curves layer or a levels layer. Whatever you feel may enhance your overall results. Here is my end result. I've added one of my Depth And Warmth Photographer Textures to the background as well as a curves adjustment.
porcelain skin Photshop CS6 tutorial
If you'd like to expand upon this tutorial to achieve an amazing vampire effect follow my video tutorial.

Thank you webdesign.org for providing such a best tutorials;

Credit Goes to: http://www.webdesign.org/photoshop/photoshop-cs6-tutorials/how-to-create-a-porcelain-skin-effect-in-adobe-photshop-cs6.21908.html#ixzz3pjaAvtVi

Sunday, October 25, 2015

Createive, Mysterious Photo Manipulation in dark MOOD


In this lesson I’ll show you how you can convert a forest into a dark, foggy, ominous scene. You’ll learn how to work with shadows, lighting, adjustment layers, layer masks, dodge & burning and much more.
Let’s get started
What you will be creating
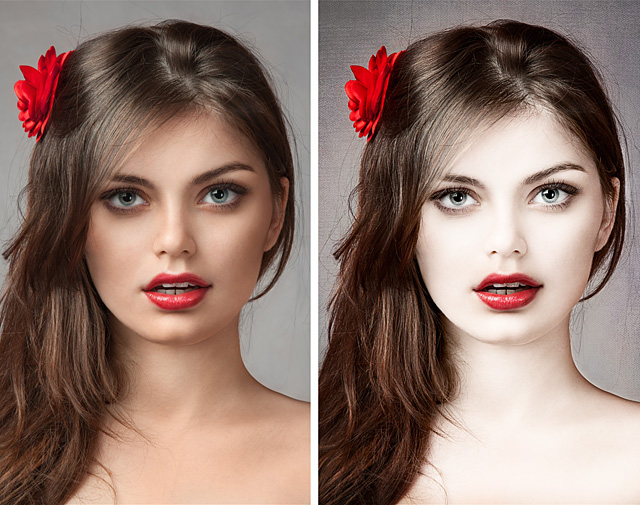
Here’s look at the outcome you’ll be able to produce by the end of this lesson:

Step 1
Create a New document by selecting file>new and use the settings shown in the image below.

Step 2
Now, place the forest image by selecting file>place then select the forest image to place it.

Step 3
I added a layer mask to forest layer by clicking second button on the layer panel then choose Gradient tool by pressing (G) on the keyboard. Choose the black and white gradient and apply it vertically from top to bottom. You can see the results on layer mask how I apply it.

Step 4
Now, I added a curves adjustment layer (settings below), and clipping it to my forest layer using a clipping mask.
Choose a soft round black brush by pressing (B) on the keyboard then paint on the layer mask of curves adjustment layer to hide the selected effect.

Step 5
Now, place the sky image below your forest layer as shown in the image below:

Step 6
I added a solid color adjustment layer to the sky. Here are the values for this layer.

Step 7
Reduce the opacity of the solid color adjustment layer to 25% and also paint black on the layer mask of the solid color adjustment layer to hide effect (see the bottom right of the below image to see where I’ve applied this mask):

Step 8
I added Photo filter and Gradient Map Adjustment layers to the sky. I also painted on the layer mask of both adjustment layer to hide the effect in certain places. See the image below for the setting and layer mask results.

Step 9
Change the blend mode of Gradient map to Multiply and reduce the opacity to 70%.

Step 10
I added a color balance adjustment layer top of all the layer and painted on the layer mask of it with soft round black brush to hide the effect a bit.

Step 11
Add a Gradient map adjustment layer and paint on the layer mask to hide the effect of gradient map adjustment layer.

Step 12
Change the blend mode of the Gradient adjustment layer to soft light and reduce the opacity to 53%. 

Step 13
Create a New layer by pressing Ctrl+Shift+N on your keyboard then Grab the brush tool and change the color to #25344d. Then paint it with opacity and flow to 30% 

Step 14
Now, change the blend mode to multiply and reduce the opacity to 50%.

Step 15
Create a new layer to make a light source then name it ‘Light source’.
Pick the soft round brush tool with opacity and flow to 100%, set the color to #286fbe and size to 2000 pixels. Paint two big strokes on the center and reduce the size of the brush to 700 pixels, change the color to #65aeff then again paint it on the mid.

Step 16
I added a layer mask to the light source layer and paint it with soft round black brush to hide it a bit not too much. You can see the results below how I have done it.

Step 17
Now, change the blend mode to Linear Dodge and reduce the opacity to 63%.

Step 18
Extract the grave with your favourite selection tool then place it here:

Step 19
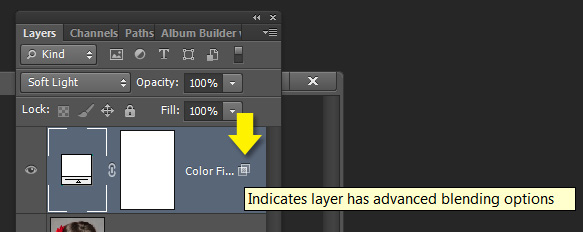
I applied a blending options effect to the grave. To apply it right click on the grave layer then choose blending options. Here are the values for blending options effect.
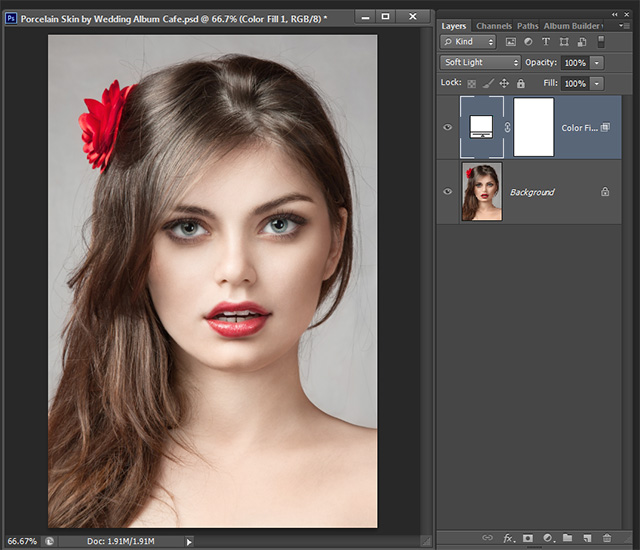
Here are the results after applying the Gradient Overlay effect.

Step 20
Next, I added curves and gradient map adjustment layer to the grave to blend it to the scene. Here are the values for the both adjustment layer.
Then change the blend mode of Gradient Map Adjustment layer to Color and reduce the opacity to 71%.

Step 21
In this step we’ll use the Dodge tool to dodge the part of the grave which reflected by our light source. Before using it, create a new layer and then go to Edit>fill and fill it 50% gray then change the blend mode of this layer to overlay.
Now Select the Dodge tool by pressing (O) on the keyboard and set the exposure to 12% and range to midtones. Then dodge the part of the grave as shown in the image below.

Step 22
Now, place the bush 1 image to the left bottom corner .

Step 23
Now, Go to Filter>Blur>Gaussian Blur and set the values.

Step 24
To blend the bush to the scene I applied a Hue/Saturation adjustment layer to the bush.

Step 25
Now, place bush 2 image to the scene as shown in the image below.
Add a layer mask to bush 2 and Hide the selected part as shown in the image by painting it with soft round black brush.

Step 26
I applied the Gaussian Blur filter and Hue/Saturation adjustment layer to bush 2 with same setting as applied in 24 & 23 Step.

Step 27
Let’s create some fog. To do this, create a new layer and fill it with black. Then change your foreground colour to #5b5a5a and background colour to #000000. Now, go to Filter>Render>Clouds and when you done it. You should achieve the results shown below. Name this layer ‘fog’.
Change the blend mode of fog layer to screen and reduce the opacity to 15%. Add a layer mask to fog layer and hide the effect of fog.

Step 28
Extract the model and place it here. The white arrow indicates that I kept the some leaves on the model layer, but don’t worry about it we’ll fix this in next couple of steps:

Step 29
I applied a blending option effect to the model.
I created a new layer below the model layer and used a soft round black brush with opacity and flow to 30% to paint some shadows as shown in the image below:
Create a new layer again below the model layer and paint some more shadows.

Step 30
Reduce the lightness of the model by applying a Hue/Saturation adjustment layer. As you can see by reducing the lightness the leaves which I kept on model are now blended properly.

Step 31
Continue blending the model to the scene by applying a Exposure and Gradient Map adjustment. See the image below for values:
I changed the blend mode of Gradient Map adjustment layer to ‘Color’ and reduce the opacity to 50%. 

Step 32
I applied the dodge and burn effect to the model. Create new layer and fill it with 50% gray. Change the blend mode to overlay. Now, select the Dodge and Burn tool then set the exposure to 12% and range to midtones. Then start dodge and burning:

Step 33
I painted some light on the model. To do this create a new layer and select the brush tool then set to opacity and flow to 30%. Now the change your foreground color to #173737 and paint some light on model.

Set the blend mode to color dodge and here are the results:

Step 34
I painted some more light rays with the same settings as in previous steps but changed the color to #0a1826:

Then set the blend mode to color dodge and reduce the opacity to 60%;

Step 35
Extract the crow and place it on the the grave:

Step 36
Apply the following blending options to the crow:

Step 37
I painted shadows for the crow like I painted the shadows for the model:

Step 38
Then, I applied a Gradient Map adjustment layer to the crow to match it color to the scene.

Step 39
We’ve completed our main blending and it’s time for final adjustments.
We’ll apply a series of adjustment layer to the entire scene. Add the Photo filter and Gradient Map adjustment layer to the scene first and see the image below for values. Change the blend mode of Gradient Map to color dodge then I painted with soft round black brush on the layer mask of Gradient Map adjustment layer.

Step 40
Now, I added a color balance adjustment layer to the scene and see the below image for the values.

Step 41
I added two more adjustment layer to the scene which is a Color Lookup and a Curves adjustment layer. I changed the blend mode Color Lookup to soft light then reduced the opacity to 30%.

Step 42
For the final step, we’ll apply a lighting filter to the scene. First of all create a new layer then press Ctrl+Shift+Alt+E to stamp all the layers in one layer. Now, go to Filter>Render>Lighting Effect then set the Hotspot as shown in the image below.

Here are the values of Lighting effect filter:
Congratulations, You’re All Done!
Awesome job making it this far! You should be proud of what you’ve created. Show it off to your friends and colleagues and get some feedback.
You can also comment here with your version, or any questions you had about the techniques used. We love to see what you guys create and we’re always here to give helpful feedback and tips to help you to improve.


Avatar Photo Manipulation Exclusive Tutorial: PHOTOSHOP


This is a Photoshop tutorial showing you all the steps you need to take in order to photo-manipulate yourself into a Na'vi (based on the characters in James Cameron's movie "Avatar").
But before we start, check these useful resources for photo manipulation that will help you create an amazing effect on your photo:
I used Photoshop CS2 in order to create this, but newer and older versions should do the same, as I used basic Photoshop tools only. I hope you will find this helpful.

Step 1
Import a photograph of your choice, but make sure its size is relatively large, as it gives more room to play with. Also, make sure that the person on the photograph is well lit - but not overlit - perhaps taken with a flash, so that enough sharp details are visible.

Step 2
Choose a "hard" brush from the"Tools" window (I tend to use a "Chalk" brush) and set its "Mode" to "Color", and its "Opacity" to 50%. Now pick a shade of blue from your Color Palette and brush over the entire skin area, leaving out the hair, eyes, and clothing. Now repeat this a couple of times using different shades of blue. In order to get the kind of blue I wanted, I did this four times in total using these colours: #5d7a99 - #32576a - #3c6986 - #54809b. However, every photograph is different, so you may prefer different shades of blue for your image.

And finally, pick a shade of purple, I used #472a50, with a small brush and its Opacity set to 10%, paint the lips with it, and then randomly brush all over the face with it, as this breaks everything up a bit, thus making it more "natural" looking.

Step 3
Now in my case, I was working on a picture of Tom Cruise with facial stubble. The Na'vi, however, don't seem to have facial hair, apart from the eyebrows - but only if they are a human hybrid (those hybrids also have smaller eyes, and five fingers on each hand instead of four). So I removed the stubble with the "Clone Stamp Tool". You have to zoom right in and press "alt" on your keyboard to select the source area, click once, then let go and paint as normal. Always make sure you pick a source area that looks most similar to the area you want to copy to, and if something doesn't look right, try a different source.

Step 4
Now remove the ears! In my case this was very easy, as I simply had to paint them black / match the background. The person on your picture may have long hair, in which case you could just hide the ears by using the "Clone Stamp Tool" and copy hair over. However if you have short hair this step could be tricky, for the Na'vi (and the hybrids) have their ears set higher up than human ears. In any case, I would probably use the Clone Stamp Tool again.
Now either you can paint the Na'vi ears yourself, do as I did - import a screenshot I found on the Internet. There are many movie screenshots you can find on the Internet. Save the image onto your computer and go to "File" then "Open..." and select the image.
You can also download the ears I've prepared to make your life easier.
Now select the "Polygonal Lasso Tool" in the Tools window, and create a mask around the ear you wish to import. Once you have done this, either drag the image over into your project, or you can go to "Edit" and "Copy" the ear and "Paste" it onto your image. It will now be on a new layer - which you can see in your "Layers" window. Now place the imported ear wherever you want it to be - you may need to resize it, so click on the "Move Tool", then click on one of the corners of your selection and click on "Maintain aspect ratio" which is the little "chain" icon in the menu (you don't have to do this if you don't wish). Now drag on one of the corners of your selection until the ear has the right size you want.

Step 5
If it's a frontal face shot you're working on, you simply need right-click with your mouse on the layer with the ear, and select "Duplicate Layer". Then right-click on one of the corners around the selection and choose "Flip Horizontally", and move the second ear to where you want it to be. As you can see, the image of the ear that I had originally imported had the tip of the ear missing. I fixed this by painting the rest in, using the Clone Stamp Tool, and the Brush Tool set to "Normal" (use the "Eyedropper Tool" to select colours from the actual ear itself).

Step 6
Now we're going to enlarge the eyes. Normally you can try and do this by eye, but because Mr Cruise is looking directly at the camera in my picture, both eyes had to be enlarged identically. First of all, duplicate the overall main image you have so far, so that you have two identical copies lying on top of each other as layers. Then use the "Polygonal Lasso Tool", with "Add to selection" selected from the menu (that way you can select several areas at the same time). Create two masks, one around each eye, including eyelids and eyebrows. Click on "Move Tool" from the Tool bar, then enlarge the selection until the eyes have the size you want. Now click on "Move Tool" again and select "Apply" on the pop-up window. Now "Copy" and Paste" from the Edit Menu. The eyes should now be on a new layer. Duplicate that layer. Then use the Eraser Tool to erase the left eye on one "eye layer", and the right eye on the other eye layer. Basically this means that you now have one layer for each eye, though both enlarged, their proportions to each other are still correct. Press "ctrl" on your keyboard and select both "eye layers" and use the arrow keys on your keyboard to move the eyes up and down, then select each individual eye to move it left and right, once again by using the arrow keys.

Step 7
You can now use the "Eraser Tool" and brush around the eyes with it to remove what is overlapping and the border lines. Doing this will reveal the layer underneath, so don't erase too much.

Step 8
This is the most difficult part - the nose! This could potentially take quite some time, so don't get frustrated, just try your best.
Use the "Rectangular Marquee Tool" and generously select the nose along with its surrounding area. Select "Filter" from the main menu and go to "Liquify...". A new window opens and you may want to zoom in a little. Select the "Forward Warp Tool" - with the "Brush Density" and "Brush Pressure" set to 100. And now "shape" the nose into that of a Na'vi's. If you make a mistake you can use the "Reconstruct Tool". It will probably look a little strange, but that's ok, just click "OK" when it looks remotely like the one in my picture. If yours looks better, excellent!

Step 9
This is still fairly difficult. You will now be using the "Burn" and "Dodge" tools from the Tools window a lot. Use both tools, with their "Range" set to "Midtones", and the "Exposure" set to 5% and continue to "shape" the nose by carefully adding definition. "Burn" darkens, while "Dodge" highlights, so make sure you figure out where the light on your picture is coming from. Because this step is so tricky, it is okay to carry on with the next steps and return to the nose from time to time.
I also used the "Dodge" tool, set to "Midtones" and "Highlights" in order to brighten the irises of the eyes. And finally I dyed the tip of my nose pink, with the Brush tool set to "Color", and the colour itself taken from the ears by using the "Eyedropper Tool".

Step 10
I continued to use the "Burn" tool - a combination of both "Midtones" and "Shadows", to further add definition all around the face. Check out the differences between images 9 and 10. You may choose not to do this on your photograph. However, you might have noticed that I went back to "Liquify" the nose a little more....

Step 11
My overall image had turned a little too dark in my opinion, so I went to my Layers window, and at the bottom I clicked on the "black and white" symbol that has the name "Create new fill or adjustment layer", and selected "Levels..." from the menu. Now a new window opens up and and all I did was click on "Auto" and "OK". However that option doesn't always turn out a good image, so you may want to play around with the sliders. Alternatively, if your image is too light or pale, you can change this here too, using the sliders.

Step 12
For the pattern and sparkles on the face, use the "Burn" tool - Midtones and Shadows, as well as the "Brush tool" - this time a circle shape - with its Hardness 50%, Opacity around 10%, so there's room to build up colour depth, the "Mode" set to "Normal". You'll need to play around with this, as it can take a while to get it right.

Step 13
Now it's time to enlarge the irises of the eyes! Basically we're repeating Step 6 here. So follow every single step, just apply them to the irises alone. Once you're happy with their position, use the "Eraser Tool" to bring back the eyelids from the layer underneath.

And finally I did some additional lighting effects, by using the "Burn Tool" set to "Shadows" and the "Dodge Tool" set to "Highlights". Check out the differences between Image 12 and 13. However this may not be relevant to your image. All done, I hope you are pleased with your results.

Most creative hand lettering and illustrations examples

Are you as obsessed with hand lettering and calligraphy like I am? If you would like to learn how to do it too, see these tutorials below. I found 8 free tutorials – 6 written and 2 videos. These designers share their process step-by-step. Note that these free tutorials are not as in-depth as the premium classes. Scroll down to the bottom to see premium online lettering classes.


Online Lettering Classes

These are premium classes that you can take online. Click on the links below the image to read more.

1. The Art of Lettering – Drawing Scripts by Hand ~ by Neil Tasker, Lettering Artist (on Skillshare)
2. The First Steps of Hand-Lettering ~ by Mary Kate McDevitt (on Skillshare)
3. Lettering for Designers: One Drop Cap Letterform at a Time ~ Jessica Hische (on Skillshare)
4. Digitizing Hand Lettering: From Sketch to Vector (Lettering II) ~ by Sean McCabe (on Skillshare)
5. Introduction to the Art of Modern Calligraphy (Calligraphy I) ~ by Molly Jacques (on Skillshare)
6. I Still Love Calligraphy ~ by Melissa Esplin
7. Learn Lettering ~ by Sean McCabe
8. Hand Lettering Power Course ~ by How Design University
9. 30 Days to Better Hand Lettering ~ by Made Vibrant

Most Creative Spring Nail Art and Designs

Spring has sprung and I sure have a spring in my step! Too much? Ok, well clearly I’m excited. To me, spring is the time to get girly in all aspects of fashion… and I love it! In winter I’m too wrapped up and layered up to actually get to showcase my personal style, so when spring finally comes around, I know I get two fantastic seasons  to play around and have fun with my clothing and my nails.

And remember, you don’t have to go out and buy hundreds of colors and shades just so that you can art-ify your nails; you can use acrylic paint on top of a base coat, and if you don’t have the right color, mix and blend until you get what you want. Only buy the colors that you know you’ll use a lot, otherwise they’ll just become thick gloopy messes if you leave them to collect dust.

Marble Rainbow Drops

By now you should be comfortable with the marbling technique, but for this more understated version, you won’t need any cups of water.

Cupcakes

Trying to keep in shape for spring and the upcoming summer may mean no more cupcake munching, so keep a reminder on your nails instead.

Sideways Ruffian

I really like the ruffian trend, so of course, I love the new and improved sideways version. The glitter polish gives it that nice little something extra for the springtime.

Dotted Ombre

Instead of using the clever sponge trick to create ombre nails, use a dotting tool (or toothpick) to give you the ombre effect but in a fresh new way.

Strawberries

What I really like about this strawberry tutorial is that it uses pink polish instead of red, giving it a more childlike candy look. Too cute!

Simple Floral Accent

What I like about this floral tutorial is that it isn’t like the traditional floral patterns I’ve featured; it’s a lot less complicated. Instead of the very intricate, colorful flowers on each nail, this one just gives you a little hint.

Poppies

I love this poppy design because it’s a nice break from all the daisies and roses (not that I don’t love those, too!). And it’s actually not quite a difficult as it looks.

Geometric Tips

French tips are so last season; well, traditional French tips, that is. Stick with the geometric trend this spring to modernize an old classic.

Daisies

Daisies generally come into season in late spring, so get yourself a head start this year by showing yours off on your nails.

Blue Roses

Instead of the more common floral nail art that shows off a few small flowers on each nail, try this larger design of a zoomed-in shot of a rose.

Faded Floral

You can bet that you’ll be seeing a lot of floral nail art for spring, but this one is a little different; the watercolor effect looks like it’s something out of the ‘60s. Love it!

Mix ‘n Match

Who says that your nails have to be uniform? Personally, I love the variety of combinations of ombre, flowers and polka dots.

Saturday, October 24, 2015

Realistic 3D Baseball Cap in Photoshop Design

In this Photoshop tutorial, I will show you how to create a realistic 3D Baseball cap in Adobe Photoshop using the Pen tool, brushes and some nifty tricks.


Step 1: Create the shape

Create a new document in Photoshop and fill it with white (#FFFFFF). Create a new layer and use the Pen Tool (P) to create the shape of the cap (you can use an image of a cap as reference for this, or use the outline shown below). After that, press Command+Enter to transform the path into a selection. Then fill it with the color #1c1812.

Step 2: Define shapes

It’s time to define some parts of the cap. Use the Burn Tool (O) for adding some shadows to the cap (shown below) and then use the Pen Tool (P) to create two lines (#413a2f).
Need Help Stroking Paths?
You can learn how to stroke paths using the pen tool and the brush tool in our photoshop tutorial on creating fireworks.

Step 3: Create the Texture

The rear part of the cap must be darker. Create a selection on the back of the hat, and use the Brush Tool (B) to fill the selection with a black color on a new layer.

Step 4

Right-click on the layer with the rear part of the cap and select Blending Options. Then go to Pattern Overlay and add the below settings.
Blend Mode: Hard Light
Scale: 7%
Opacity: 13%

Step 5

The seams of the visor are created with the Pen Tool (P). Create each seam on a separate layer by drawing the line with the pen tool, stroking with a thin hard brush, and then erasing the edges with a large soft eraser. Select these layers with the seams, and Merge Layers.
Duplicate them, invert their color (Ctrl+I) and place the black seams layer behind the other ones. This gives it a bevel effect.

Step 6

Create a new layer. Again use the Pen Tool (P) to create a shape like below and fill the selection with black. Then add noise to the selection (Filter > Noise > Add Noise | Keep it below 10%), and keep the Opacity of the layer to 75%.

Step 7

Create another layer and build a shape like below using the Pen Tool (P). Next thing you’ll have to do is to add some light, to make the rear side of the cap look more transparent (as if light is fading through from the other side). Use the Brush Tool (B) with white color and add some smooth light.

Step 8: Add logo

To give it an unique look you can add a brand or some unique design elements of your own. I used #7b7452 and then set the layer to Color Dodge.

Step 9: Details

To create the shape of the deeper lines in the cap, use the Pen Tool (P) to create shape selections, add lights and shadows using the Burn and Dodge Tools. Smudge the highlights and shadows to give them a softer look.

Step 10: Light

You must add some light on the visor, so make a selection and use large white brush to fill in the selection. Then select the Hard Light blending mode and decrease the opacity if needed.

Step 11: Realistic Texture

The material looks a bit cartoonish and smooth, so we need to brush some spots with different colors (darker/lighter). You can smudge them (or give them different Filter>Blur>Motion Blur effects) to make them look more realistic.

Step 12: Background

The cap is finished. Now you must create the background.

Step 13: Light

To make it more obvious and shiny, we must modify the contrast and the brightness. Select all the hat layers and merge them onto a new layer (Ctrl + Alt + E). Adjust the Contrast and Brightness (Image > Adjustments > Brightness and Contrast) until the hat pops out from the background significantly.

Step 14: Shadow

The cap looks like it is floating so we must add a shadow.

Step 15: Background

Create a new layer (ctrl+shift+n) and place it behind the cap layers. After that use some grunge brushes (like these) create a nice background using various colors.

Step 16: Background

The final step of this chop is to add light on the bottom and shadow to the top to create the space where the cap is placed.
Use PenTool(P) to make the selection and using a large soft brush create the platform for the cap.

Conclusion

Try to improvise as much as you can when you are creating the design of the cap. It’s not necessary to use all the same colors, or create a grungy background! Enjoy, and feel free to download the free PSD for reference!